前一节深入理解 Kafka 之 Producer介绍生产者的代码,本节介绍服务端的代码
网络
服务端的网络框架也是使用 NIO与生产者网络底层代码是复用,都是 org.apache.kafka.common.network.Selector。下面介绍时关于 NIO 方面会略过(详情查阅生产者的介绍),重点介绍网络结构
// 	kafka.Kafka.main, kafka 启动时调用
// kafka.server.KafkaServerStartable.startup
// kafka.server.KafkaServer

  // request 和 respon channel 存储
  // totalProcessorThreads 默认三个和 processer 线程数一致
  // maxQueuedRequests 默认 500
  val requestChannel = new RequestChannel(totalProcessorThreads, maxQueuedRequests)
// 启动流程,创建和启动很多组件
  def startup() {
    ...
    val canStartup = isStartingUp.compareAndSet(false, true)
    if (canStartup) {
      ...
      /* start scheduler */
      kafkaScheduler.startup()

      /* setup zookeeper */
      // zk 相关
      zkUtils = initZk()

      /* Get or create cluster_id */
      _clusterId = getOrGenerateClusterId(zkUtils)
      info(s"Cluster ID = $clusterId")

      notifyClusterListeners(kafkaMetricsReporters ++ reporters.asScala)

      /* 数据读写清除管理 */
      logManager = createLogManager(zkUtils.zkClient, brokerState)
      logManager.startup()

      /* generate brokerId */
      config.brokerId =  getBrokerId
      this.logIdent = "[Kafka Server " + config.brokerId + "], "

      metadataCache = new MetadataCache(config.brokerId)

      // NIO 网络相关,接收请求、返回响应
      socketServer = new SocketServer(config, metrics, kafkaMetricsTime)
      socketServer.startup()

      /* broker 管理 */
      replicaManager = new ReplicaManager(config, metrics, time, kafkaMetricsTime, zkUtils, kafkaScheduler, logManager,
        isShuttingDown, quotaManagers.follower)
      replicaManager.startup()

      /* start kafka controller */
      kafkaController = new KafkaController(config, zkUtils, brokerState, kafkaMetricsTime, metrics, threadNamePrefix)
      kafkaController.startup()

      adminManager = new AdminManager(config, metrics, metadataCache, zkUtils)

      /* start group coordinator */
      groupCoordinator = GroupCoordinator(config, zkUtils, replicaManager, kafkaMetricsTime)
      groupCoordinator.startup()

      /* Get the authorizer and initialize it if one is specified.*/
      authorizer = Option(config.authorizerClassName).filter(_.nonEmpty).map { authorizerClassName =>
        val authZ = CoreUtils.createObject[Authorizer](authorizerClassName)
        authZ.configure(config.originals())
        authZ
      }

      /* 请求处理转发中心 */
      apis = new KafkaApis(socketServer.requestChannel, replicaManager, adminManager, groupCoordinator,
        kafkaController, zkUtils, config.brokerId, config, metadataCache, metrics, authorizer, quotaManagers, clusterId)

      requestHandlerPool = new KafkaRequestHandlerPool(config.brokerId, socketServer.requestChannel, apis, config.numIoThreads)

      Mx4jLoader.maybeLoad()

      /* start dynamic config manager */
      dynamicConfigHandlers = Map[String, ConfigHandler](ConfigType.Topic -> new TopicConfigHandler(logManager, config, quotaManagers),
                                                          ConfigType.Client -> new ClientIdConfigHandler(quotaManagers),
                                                          ConfigType.User -> new UserConfigHandler(quotaManagers),
                                                          ConfigType.Broker -> new BrokerConfigHandler(config, quotaManagers))

      // Create the config manager. start listening to notifications
      dynamicConfigManager = new DynamicConfigManager(zkUtils, dynamicConfigHandlers)
      dynamicConfigManager.startup()

      /* tell everyone we are alive */
      val listeners = config.advertisedListeners.map {case(protocol, endpoint) =>
        if (endpoint.port == 0)
          (protocol, EndPoint(endpoint.host, socketServer.boundPort(protocol), endpoint.protocolType))
        else
          (protocol, endpoint)
      }
      kafkaHealthcheck = new KafkaHealthcheck(config.brokerId, listeners, zkUtils, config.rack,
        config.interBrokerProtocolVersion)
      kafkaHealthcheck.startup()

      // Now that the broker id is successfully registered via KafkaHealthcheck, checkpoint it
      checkpointBrokerId(config.brokerId)

      /* register broker metrics */
      registerStats()

      brokerState.newState(RunningAsBroker)
      shutdownLatch = new CountDownLatch(1)
      startupComplete.set(true)
      isStartingUp.set(false)
      AppInfoParser.registerAppInfo(jmxPrefix, config.brokerId.toString)
      info("started")
    }
  }
- SocketServer:接受网络请求
- KafkaRequestHandlerPool:处理 processer 读取数据封装好的 request 并返回 respon
- LogManager:数据管理
- log
- segment
- log
- KafkaApis:请求处理统一管理
- ReplicaManager:broker 节点管理
Accept
// socketServer = new SocketServer(config, metrics, kafkaMetricsTime)
// socketServer.startup()

// kafka.network.SocketServer
def startup() {
  this.synchronized {
    ...
    var processorBeginIndex = 0
    // endpoints = server.properties 设置的 hostname:9092
    endpoints.values.foreach { endpoint =>
      val protocol = endpoint.protocolType
      // numProcessorThreads 默认3,创建接收 read 事件的线程数
      val processorEndIndex = processorBeginIndex + numProcessorThreads

      for (i <- processorBeginIndex until processorEndIndex)
        // 创建 read 事件的线程数,下面介绍 processors创建和功能
        // 请求由 Acceptor 建立连接,连接后分发到 processors 来处理后续 read
        processors(i) = newProcessor(i, connectionQuotas, protocol)

      // 新建 Acceptor 线程,负责整个服务端 accept 请求
      val acceptor = new Acceptor(endpoint, sendBufferSize, recvBufferSize, brokerId,
        processors.slice(processorBeginIndex, processorEndIndex), connectionQuotas)
      acceptors.put(endpoint, acceptor)
      // 启动 acceptor
      Utils.newThread("kafka-socket-acceptor-%s-%d".format(protocol.toString, endpoint.port), acceptor, false).start()
      // 线程同步,等待 acceptor 线程启动
      acceptor.awaitStartup()
      ...
}
// kafka.network.Acceptor
private[kafka] class Acceptor{
  // nio 服务端 selector
  private val nioSelector = NSelector.open()
  // nio 服务端 channel
  val serverChannel = openServerSocket(endPoint.host, endPoint.port)
  this.synchronized {
    // 启动处理 read 事件的 process 线程,默认三个
    processors.foreach { processor =>
      Utils.newThread("kafka-network-thread-%d-%s-%d".format(brokerId, endPoint.protocolType.toString, processor.id), processor, false).start()
    }
  }
  def run() {
    // 注册 OP_ACCEPT,表示只处理 ACCEPT
    serverChannel.register(nioSelector, SelectionKey.OP_ACCEPT)
    startupComplete()
    try {
      var currentProcessor = 0
      // 死循环
      while (isRunning) {
        try {
          val ready = nioSelector.select(500)
          if (ready > 0) {
            // 有 ACCEPT 事件
            val keys = nioSelector.selectedKeys()
            val iter = keys.iterator()
            while (iter.hasNext && isRunning) {
              try {
                val key = iter.next
                iter.remove()
                if (key.isAcceptable)
                  // 处理 ACCEPT 事件
                  // processors = Array[Processor]
                  // 此处表示选择 currentProcessor 序号的Processor 来处理channel后续事件
                  accept(key, processors(currentProcessor))
                else
                  throw new IllegalStateException("Unrecognized key state for acceptor thread.")

                // 轮训将 channel 发送到 processors 线程中
                currentProcessor = (currentProcessor + 1) % processors.length
              ...
}
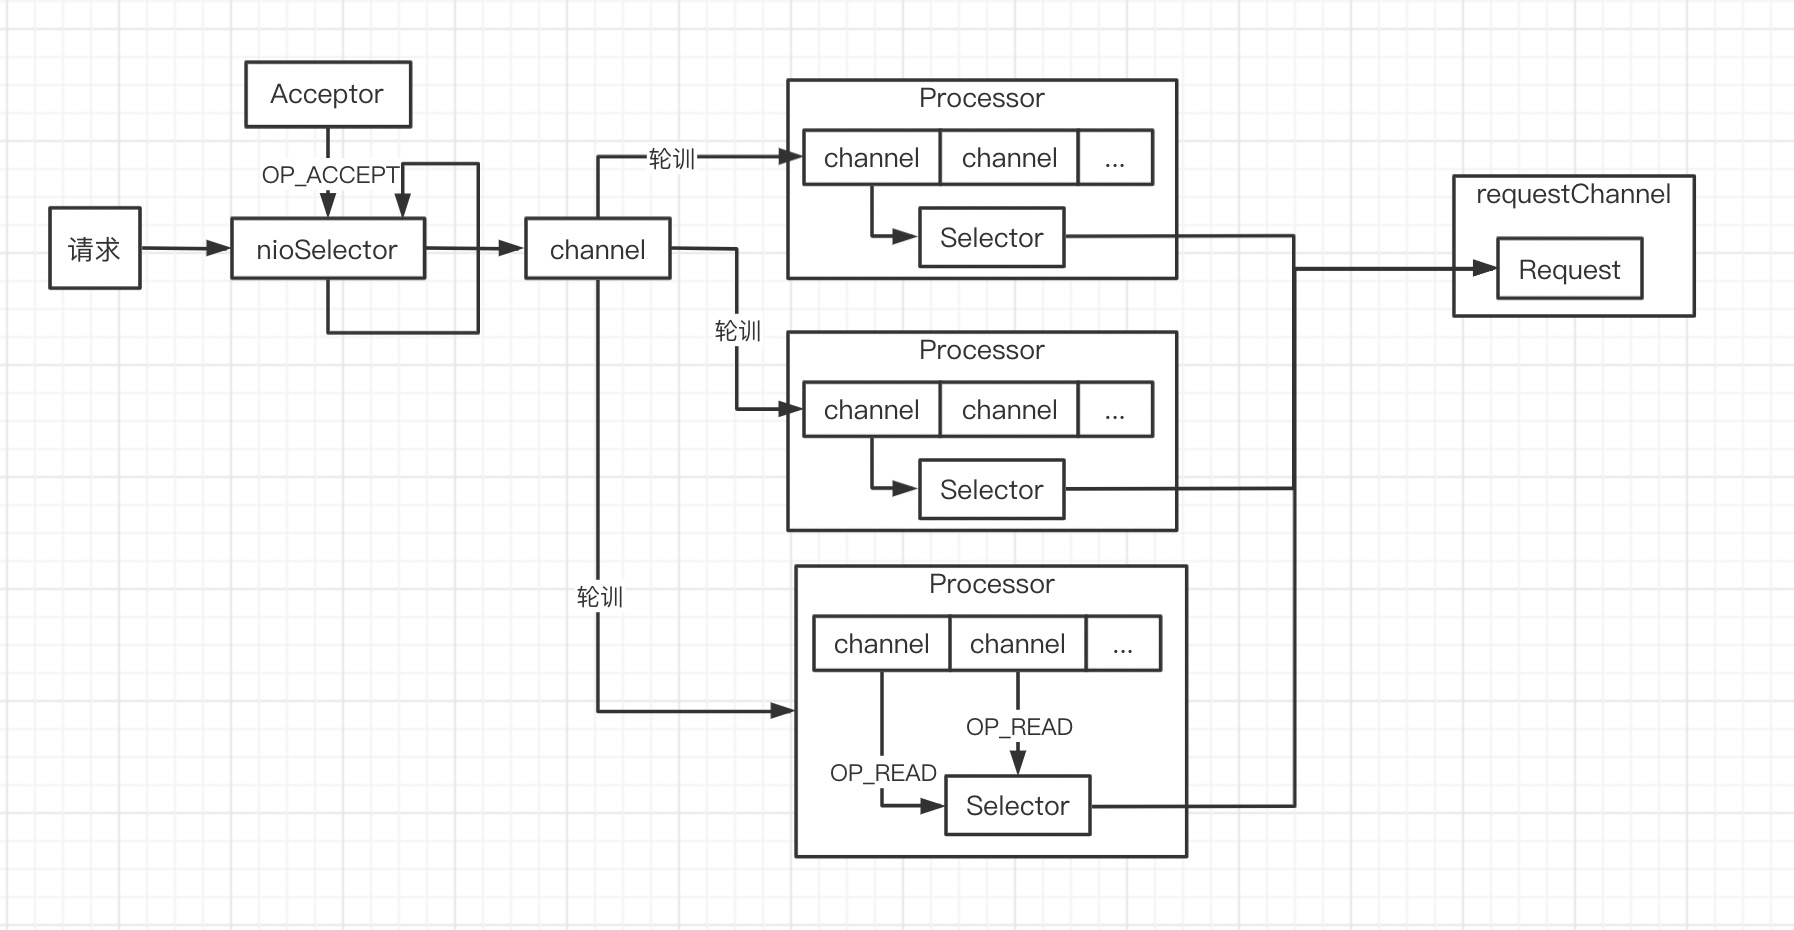
SocketServer 启动时创建 Acceptor,Acceptor 作为 NIO server 端只接收 OP_ACCEPT 事件。
SocketServer 启动时创建 Processor 线程组,Acceptor 启动时也启动 Processor 线程组中的每一个线程。
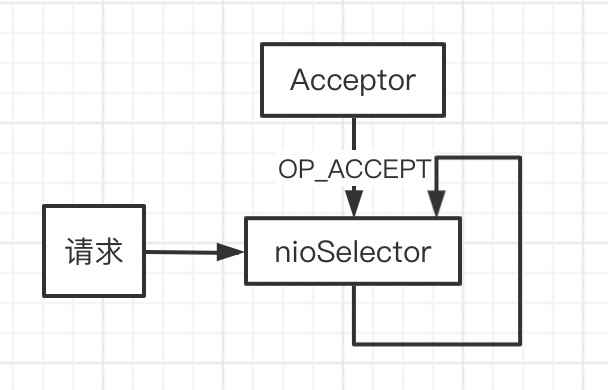
processors
// accept(key, processors(currentProcessor))
// kafka.network.Acceptor
// 处理 accept 事件
def accept(key: SelectionKey, processor: Processor) {
  val serverSocketChannel = key.channel().asInstanceOf[ServerSocketChannel]
  val socketChannel = serverSocketChannel.accept()
  try {
    connectionQuotas.inc(socketChannel.socket().getInetAddress)
    // 服务端 channel 设置非阻塞
    socketChannel.configureBlocking(false)
    socketChannel.socket().setTcpNoDelay(true)
    socketChannel.socket().setKeepAlive(true)
    if (sendBufferSize != Selectable.USE_DEFAULT_BUFFER_SIZE)
      socketChannel.socket().setSendBufferSize(sendBufferSize)
    // channel 交给 processor 线程处理
    // 此处的 processor 根据 index 每次轮训
    processor.accept(socketChannel)
  }
}
Acceptor 处理 accept 事件获取到 channel,此 channel 后续操作交由 processor 线程处理。
// processors(i) = newProcessor(i, connectionQuotas, protocol)
// kafka.network.SocketServer
protected[network] def newProcessor(id: Int, connectionQuotas: ConnectionQuotas, protocol: SecurityProtocol): Processor = {
  new Processor(id,
    time,
    config.socketRequestMaxBytes,
    requestChannel,
    connectionQuotas,
    config.connectionsMaxIdleMs,
    protocol,
    config.values,
    metrics
  )
}
// kafka.network.Processor
// Processor 处理某个连接的所有请求,默认有3个线程,每个线程都有单独的 selector
private[kafka] class Processor{
  // 存储请求
  private val newConnections = new ConcurrentLinkedQueue[SocketChannel]()
  // 创建 selector
  private val selector = new KSelector()

  def accept(socketChannel: SocketChannel) {
    // 添加新的 channel
    newConnections.add(socketChannel)
    wakeup()
  }
  override def run() {
    startupComplete()
    while (isRunning) {
      try {
        // 新的 channel 注册到 selector
        configureNewConnections()
        // 处理响应,写事件;requestHandler 写入 respon
        processNewResponses()
        // 获取事件并处理;与生产者代码相同,不展开了
        poll()
        // 处理 接收完成 事件
        processCompletedReceives()
        // 处理 发送完成 事件
        processCompletedSends()
        // 处理 连接断开 事件
        processDisconnected()
      }
  // 新的 channel 注册到 selector
  private def configureNewConnections() {
    while (!newConnections.isEmpty) {
      val channel = newConnections.poll()
      try {
        debug(s"Processor $id listening to new connection from ${channel.socket.getRemoteSocketAddress}")
        val localHost = channel.socket().getLocalAddress.getHostAddress
        val localPort = channel.socket().getLocalPort
        val remoteHost = channel.socket().getInetAddress.getHostAddress
        val remotePort = channel.socket().getPort
        val connectionId = ConnectionId(localHost, localPort, remoteHost, remotePort).toString
        // channel 注册到 selector 并添加 OP_READ 事件
        selector.register(connectionId, channel)
      ...
  }
}
到此为止,我们了解的流程:
Acceptor处理accept事件,得到新的连接 channel;- 新的 channel 通过轮训的方式发送到某个 Processor 线程
- Processor 线程得到新的 channel ,将其添加到
selector并注册OP_READ
接下来我们继续研究 Processor 如何处理 OP_READ
// kafka.network.Processor
poll()          // 读取 OP_READ 事件的数据得到 receive(不展开,有兴趣看上节生产者代码)
/**
  * 接收读取完毕后的处理
  */
private def processCompletedReceives() {
  selector.completedReceives.asScala.foreach { receive =>
    try {
      val channel = selector.channel(receive.source)
      val session = RequestChannel.Session(new KafkaPrincipal(KafkaPrincipal.USER_TYPE, channel.principal.getName),
        channel.socketAddress)
      val req = RequestChannel.Request(processor = id, connectionId = receive.source, session = session, buffer = receive.payload, startTimeMs = time.milliseconds, securityProtocol = protocol)
      // 读取到的 receive 封装成 Request 添加到 requestChannel
      requestChannel.sendRequest(req)
      // 接收读取完毕后,当前 channel 移除在 selector 上注册的 OP_READ 事件
      selector.mute(receive.source)
    }
    ...
}
Processor 流程到先到这里,它处理 channel 的 read 事件读取数据,并将数据封装成 Request 添加到 requestChannel
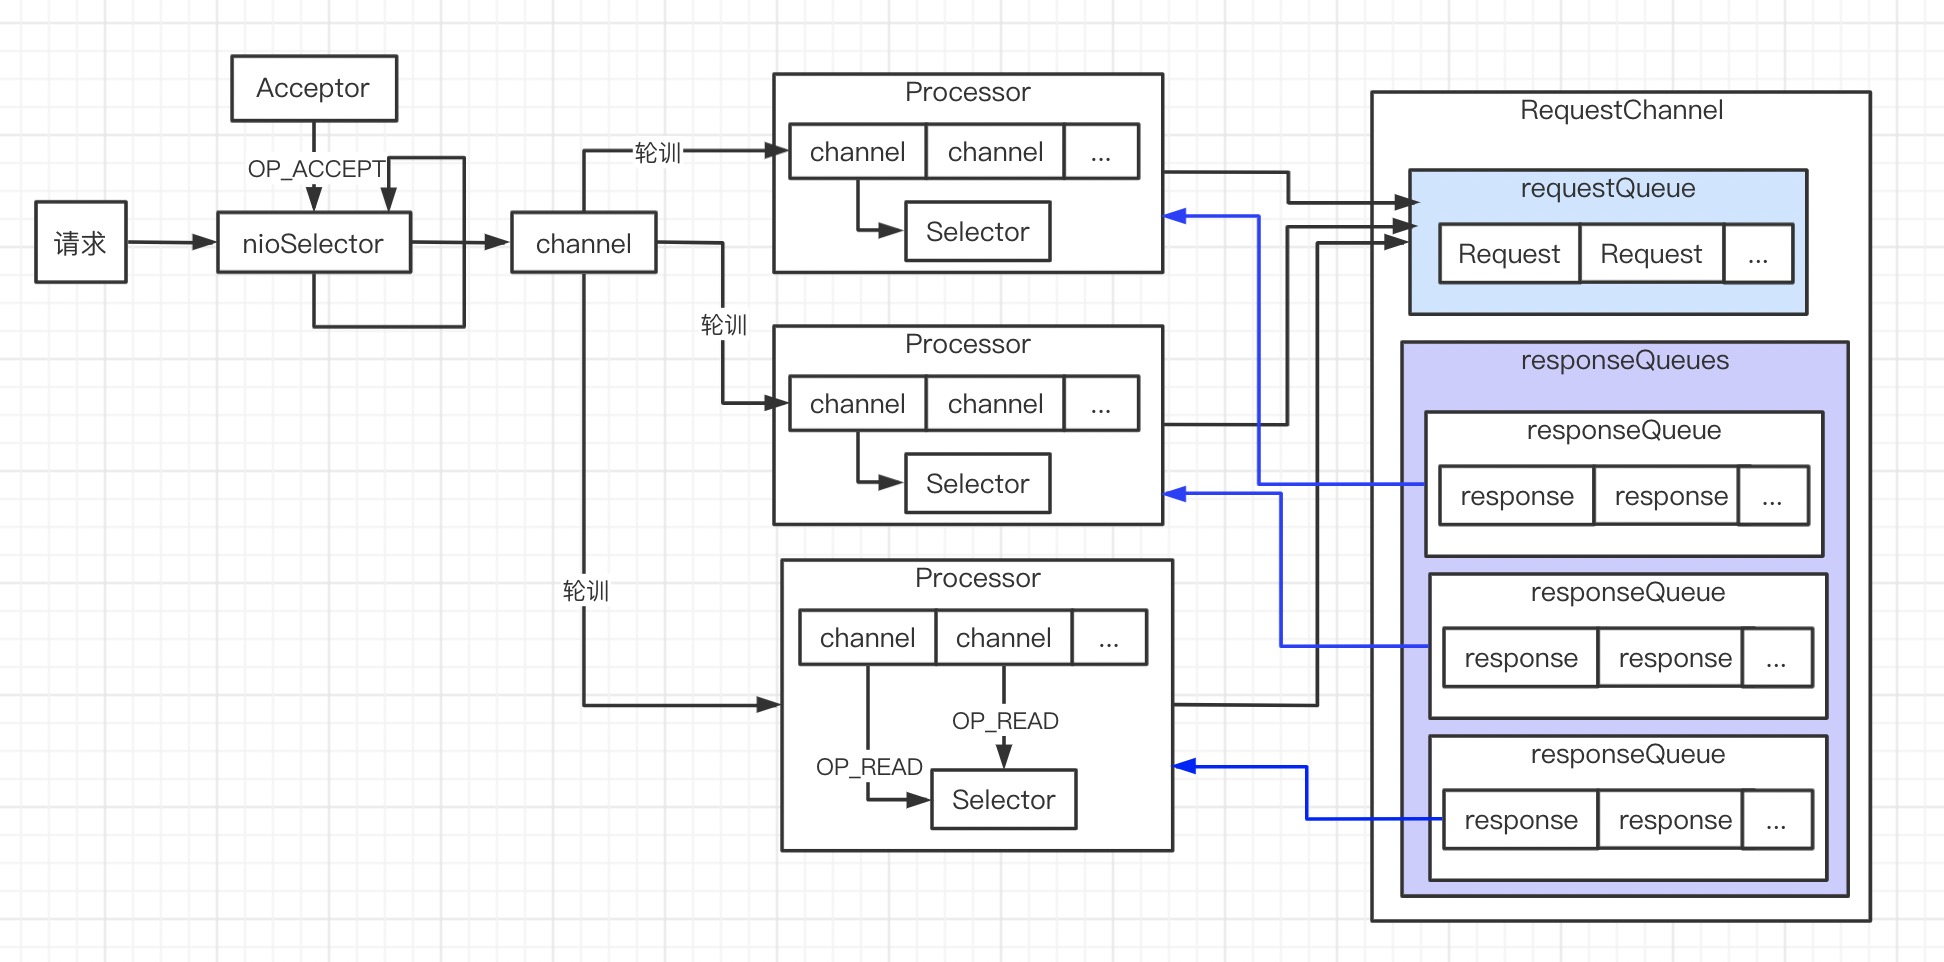
RequestChannel
// val requestChannel = new RequestChannel(totalProcessorThreads, maxQueuedRequests)
// kafka.network.RequestChannel
class RequestChannel(val numProcessors: Int, val queueSize: Int){
  private var responseListeners: List[(Int) => Unit] = Nil
  // processer 线程读取到数据封装 request 添加到此队列
  private val requestQueue = new ArrayBlockingQueue[RequestChannel.Request](queueSize)
  // 与 processer 线程数相同的 响应队列,write data
  private val responseQueues = new Array[BlockingQueue[RequestChannel.Response]](numProcessors)
  // 创建 responseQueues
  for(i <- 0 until numProcessors)
    responseQueues(i) = new LinkedBlockingQueue[RequestChannel.Response]()

  // requestChannel.sendRequest(req)
  // requestQueue 线程安全,但会阻塞
  // 当 requestQueue 没有空间时(默认500),阻塞直到有空间
  def sendRequest(request: RequestChannel.Request) {
    requestQueue.put(request)
  }
}
KafkaRequestHandlerPool
// requestHandlerPool = new KafkaRequestHandlerPool(config.brokerId, socketServer.requestChannel, apis, config.numIoThreads)
// kafka.server.KafkaRequestHandlerPool
class KafkaRequestHandlerPool{
  // numThreads 线程数默认8个
  val threads = new Array[Thread](numThreads)
  val runnables = new Array[KafkaRequestHandler](numThreads)
  for(i <- 0 until numThreads) {
    // 默认启动8个线程
    runnables(i) = new KafkaRequestHandler(i, brokerId, aggregateIdleMeter, numThreads, requestChannel, apis)
    threads(i) = Utils.daemonThread("kafka-request-handler-" + i, runnables(i))
    threads(i).start()
  }
// kafka.server.KafkaRequestHandler
// 处理 requestQueue
class KafkaRequestHandler{
  this.logIdent = "[Kafka Request Handler " + id + " on Broker " + brokerId + "], "

  def run() {
    while(true) {
      try {
        var req : RequestChannel.Request = null
        // 死循环直到从 requestChannel 获取到 request
        while (req == null) {
          // We use a single meter for aggregate idle percentage for the thread pool.
          // Since meter is calculated as total_recorded_value / time_window and
          // time_window is independent of the number of threads, each recorded idle
          // time should be discounted by # threads.
          val startSelectTime = SystemTime.nanoseconds
          // 若 requestChannel 没有 request 会 block
          req = requestChannel.receiveRequest(300)
          val idleTime = SystemTime.nanoseconds - startSelectTime
          aggregateIdleMeter.mark(idleTime / totalHandlerThreads)
        }

        if(req eq RequestChannel.AllDone) {
          debug("Kafka request handler %d on broker %d received shut down command".format(
            id, brokerId))
          return
        }
        req.requestDequeueTimeMs = SystemTime.milliseconds
        trace("Kafka request handler %d on broker %d handling request %s".format(id, brokerId, req))
        // handle and respon
        apis.handle(req)
        ...
  }
requestHandlerPool 默认创建8个线程从 requestChannel 获取 request ,最终由 apis 处理并返回 respon。
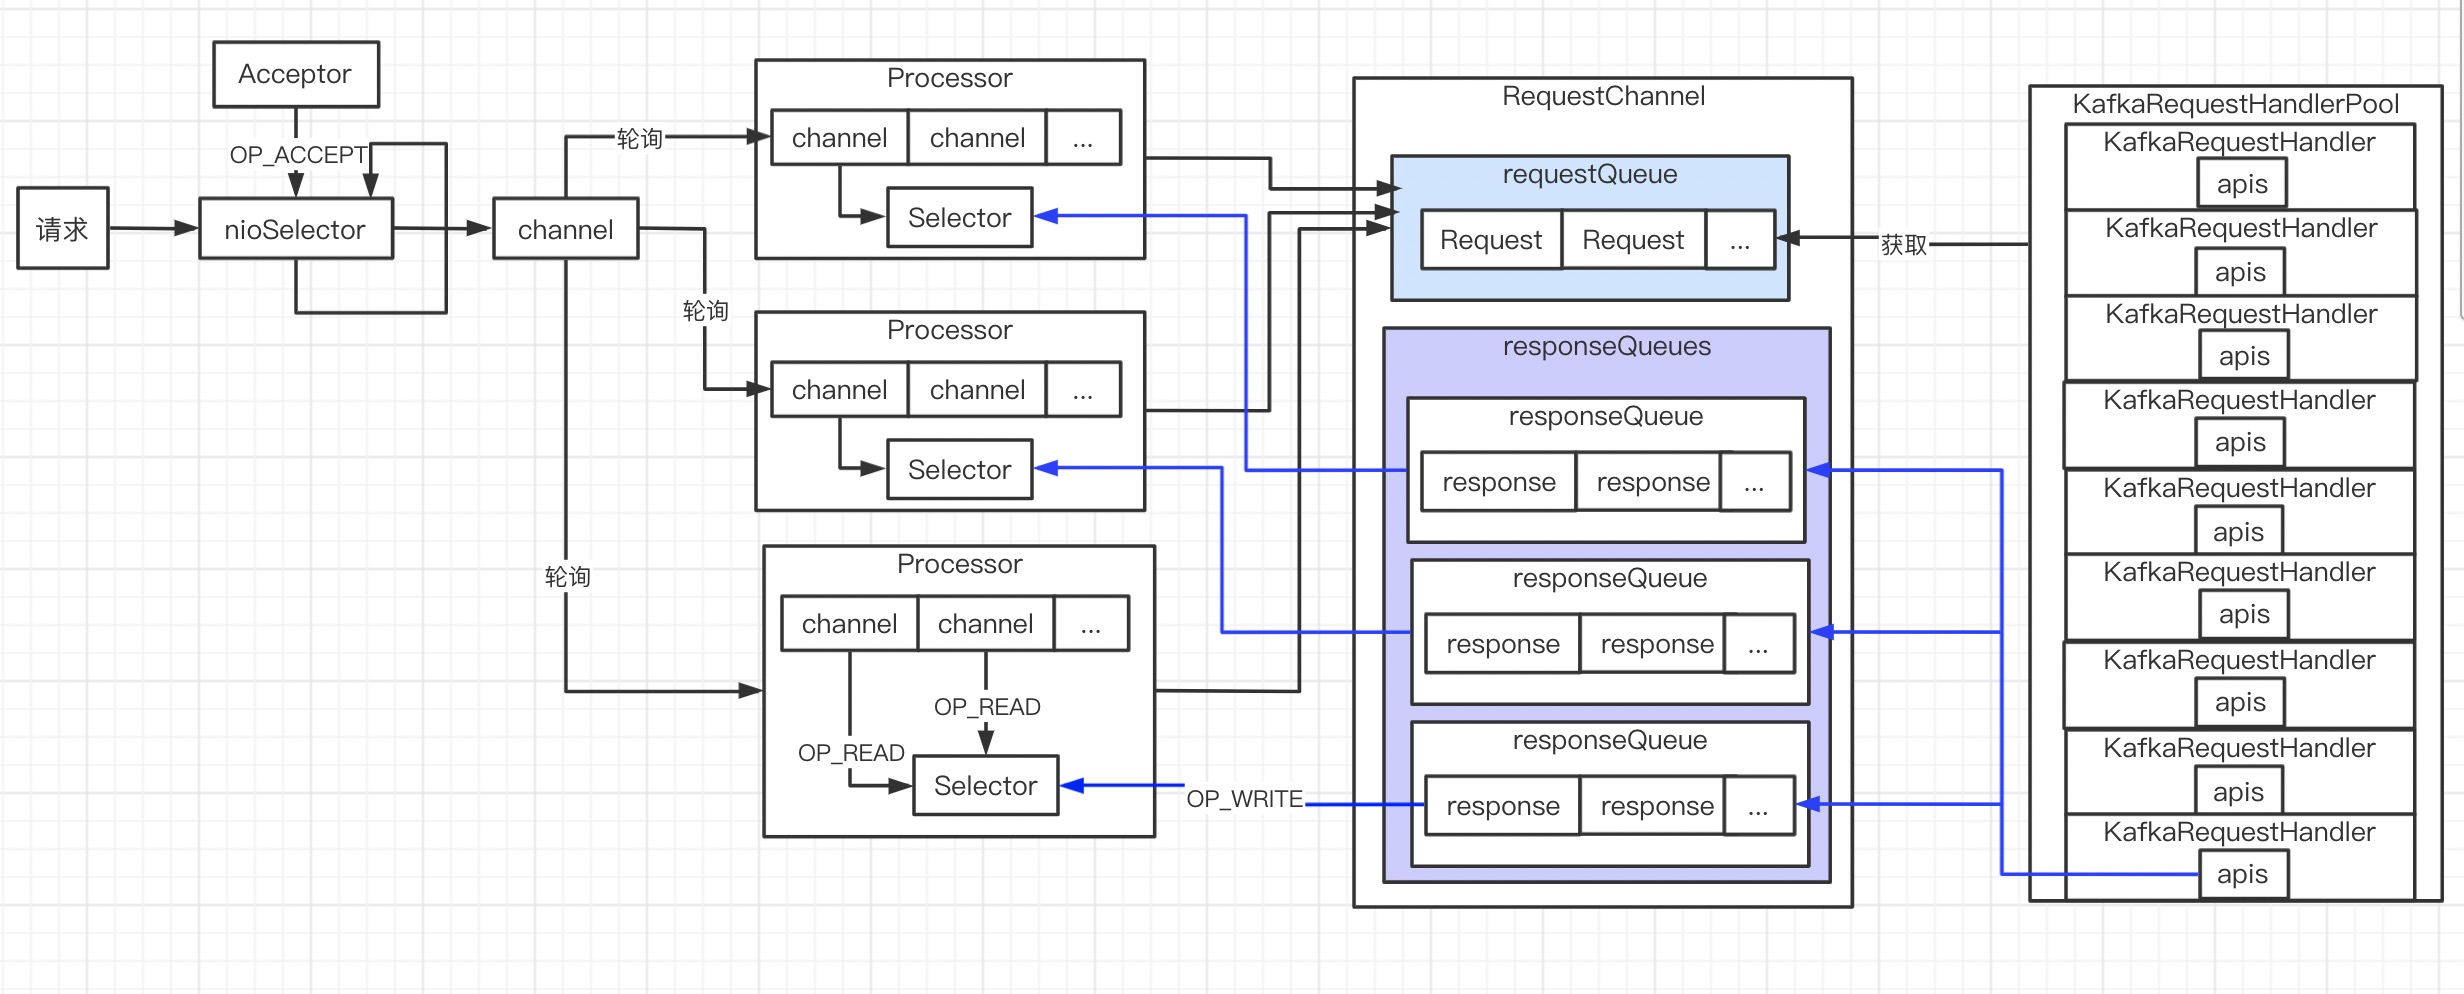
到此,网络相关的脉络都清晰了
- Acceptor 线程处理 connect 请求
- Processor 处理 channel 的read ,并封装成 request 放到
RequestChannel消息队列 - KafkaRequestHandler 从
RequestChannel消息队列获取 request,并将 respon 放入 responseQueues - Processor 从 responseQueues 获取响应,返回给客户端。
Log
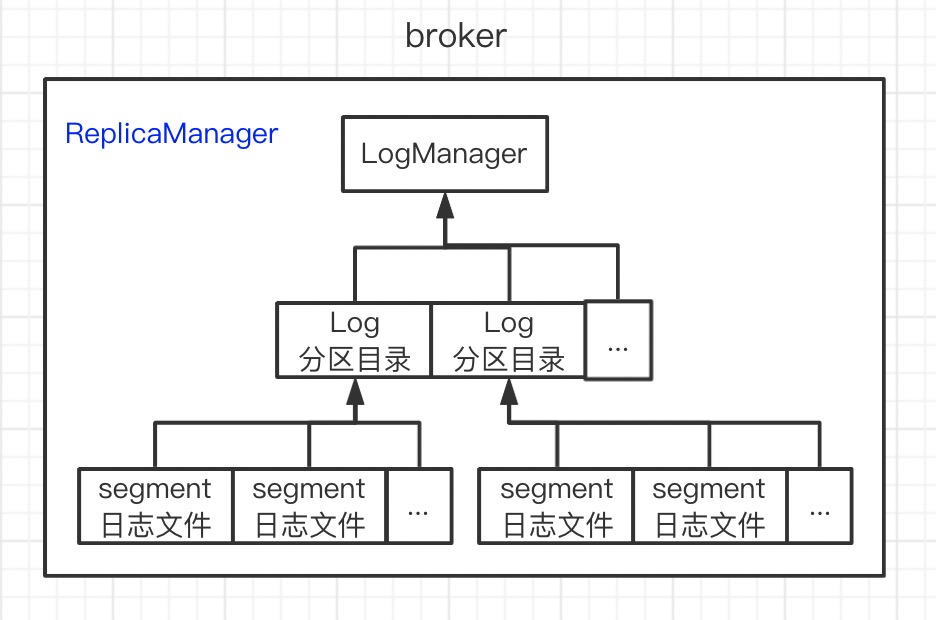
kafka 中的一条数据称为 log,以 topic 概念组织起来。但 topic 只是个逻辑概念,topic 下的分区才是真实存在的。分区是磁盘上真实存在的目录,目录下包括很多的日志文件,每个日志文件就是一个 segment。
kafka 是一个集群,每个 broker 中的log 由 ReplicaManager 控制:读、写、副本同步。
logManager
// logManager.startup()
// kafka.log.LogManager
class LogManager{
  val InitialTaskDelayMs = 30*1000
  // 每个分区对应一个 log 对象,log 对象操纵数据
  private val logs = new Pool[TopicAndPartition, Log]()
  // logDirs 是 kafka 配置文件中的 data 目录
  // 校验保存数据的目录是否有效
  createAndValidateLogDirs(logDirs)
  // 加载log(每个分区目录独有)
  loadLogs()
 private def loadLogs(): Unit = {
  ...
  for (dir <- this.logDirs) {
    // ioThreads 默认1
    val pool = Executors.newFixedThreadPool(ioThreads)
    threadPools.append(pool)
    ...
    var recoveryPoints = Map[TopicAndPartition, Long]()
    try {
      // 重读 recovery-point-offset-checkpoint 文件 恢复
      recoveryPoints = this.recoveryPointCheckpoints(dir).read
    }
    ...
    val jobsForDir = for {
      // dirContent = 数据目录下的所有文件
      dirContent <- Option(dir.listFiles).toList
      // logDir = 分区目录
      logDir <- dirContent if logDir.isDirectory
    } yield {
      CoreUtils.runnable {
        debug("Loading log '" + logDir.getName + "'")
        // 从目录名称解析出分区名 xx-2 表示 xx topic 2分区
        val topicPartition = Log.parseTopicPartitionName(logDir)
        val config = topicConfigs.getOrElse(topicPartition.topic, defaultConfig)
        val logRecoveryPoint = recoveryPoints.getOrElse(topicPartition, 0L)
        // 重新构建 log 对象
        val current = new Log(logDir, config, logRecoveryPoint, scheduler, time)
        // 保存log 对象
        val previous = this.logs.put(topicPartition, current)
        ...
  }
// kafka.log.Log
class Log{
  // 目录下每组文件称为 segment(数据+索引),一个log 包含很多 segment
  // map 结构<segment baseoffset, segment>
  private val segments: ConcurrentNavigableMap[java.lang.Long, LogSegment] = new ConcurrentSkipListMap[java.lang.Long, LogSegment]
  // 加载  segment
  loadSegments() = {
    ...
    // 数据文件中重新构建 segment
    val segment = new LogSegment(dir = dir,
                              startOffset = start,
                              indexIntervalBytes = config.indexInterval,
                              maxIndexSize = config.maxIndexSize,
                              rollJitterMs = config.randomSegmentJitter,
                              time = time,
                              fileAlreadyExists = true)
    ...
  }
}

   // kafka.log.LogManager
   // 主要是清理数据线程
   def startup() {
    /* Schedule the cleanup task to delete old logs */
    if(scheduler != null) {
      // cleanupLogs 清理过期数据,5分钟清理一次
      // 筛选出过期 segment 后异步删除
      info("Starting log cleanup with a period of %d ms.".format(retentionCheckMs))
      scheduler.schedule("kafka-log-retention",
                          cleanupLogs,
                          delay = InitialTaskDelayMs,
                          period = retentionCheckMs,
                          TimeUnit.MILLISECONDS)
      info("Starting log flusher with a default period of %d ms.".format(flushCheckMs))
      // flushDirtyLogs 默认不刷磁盘,由操纵系统 page cache 自动刷
      scheduler.schedule("kafka-log-flusher",
                          flushDirtyLogs,
                          delay = InitialTaskDelayMs,
                          period = flushCheckMs,
                          TimeUnit.MILLISECONDS)
      // 恢复
      scheduler.schedule("kafka-recovery-point-checkpoint",
                          checkpointRecoveryPointOffsets,
                          delay = InitialTaskDelayMs,
                          period = flushCheckpointMs,
                          TimeUnit.MILLISECONDS)
    }
}
LogManager 启动时扫描每个数据路径下分区目录,每个分区构建出 log 对象;构建 log 对象时,扫描每个分区下的数据文件构建 segment。 三者之间的关系加上 ReplicaManager 如下所示
log
Log 负责 record append 操作。我们把思绪往前拉:KafkaRequestHandler 从 RequestChannel 获取 request 并交给 apis 处理。
// apis.handle(req)
// 生产者发送请求时:KafkaApis.handleProducerRequest
// replicaManager.appendMessages
// -> partition.appendMessagesToLeader
// -> log.append
// -> segment.append
由以上流程可知层级关系:
- replicaManager 管理整个 broker 上所有的 partition
- partition:分区的数据结构
- log
- segment:
// kafka.log.Log
def append(messages: ByteBufferMessageSet, assignOffsets: Boolean = true): LogAppendInfo = {
  val appendInfo = analyzeAndValidateMessageSet(messages)
  ...
  try {
    // they are valid, insert them in the log
    // 锁
    lock synchronized {

      if (assignOffsets) {
        // assign offsets to the message set
        // 获取当前offset
        val offset = new LongRef(nextOffsetMetadata.messageOffset)
        appendInfo.firstOffset = offset.value

        val now = time.milliseconds
        val validateAndOffsetAssignResult = try {
          validMessages.validateMessagesAndAssignOffsets(offset,
                                                          now,
                                                          appendInfo.sourceCodec,
                                                          appendInfo.targetCodec,
                                                          config.compact,
                                                          config.messageFormatVersion.messageFormatVersion,
                                                          config.messageTimestampType,
                                                          config.messageTimestampDifferenceMaxMs)
        } catch {
          case e: IOException => throw new KafkaException("Error in validating messages while appending to log '%s'".format(name), e)
        }
        validMessages = validateAndOffsetAssignResult.validatedMessages

        appendInfo.maxTimestamp = validateAndOffsetAssignResult.maxTimestamp
        appendInfo.offsetOfMaxTimestamp = validateAndOffsetAssignResult.offsetOfMaxTimestamp
        appendInfo.lastOffset = offset.value - 1
        ...
      // check messages set size may be exceed config.segmentSize
      if (validMessages.sizeInBytes > config.segmentSize) {
        throw new RecordBatchTooLargeException("Message set size is %d bytes which exceeds the maximum configured segment size of %d."
          .format(validMessages.sizeInBytes, config.segmentSize))
      }

      // maybe roll the log if this segment is full
      // 获取 segment:已存在/新建
      val segment = maybeRoll(messagesSize = validMessages.sizeInBytes,
                              maxTimestampInMessages = appendInfo.maxTimestamp)

      // now append to the log
      // segment append
      segment.append(firstOffset = appendInfo.firstOffset, largestTimestamp = appendInfo.maxTimestamp,
        offsetOfLargestTimestamp = appendInfo.offsetOfMaxTimestamp, messages = validMessages)

      // increment the log end offset
      // msg添加成功,增加当前 log(分区) 的offset
      // 即更新 LEO
      updateLogEndOffset(appendInfo.lastOffset + 1)
      ...
//
private def maybeRoll(messagesSize: Int, maxTimestampInMessages: Long): LogSegment = {
  val segment = activeSegment
  val now = time.milliseconds
  val reachedRollMs = segment.timeWaitedForRoll(now, maxTimestampInMessages) > config.segmentMs - segment.rollJitterMs
  if (segment.size > config.segmentSize - messagesSize ||
      (segment.size > 0 && reachedRollMs) ||
      segment.index.isFull || segment.timeIndex.isFull) {
    // 当前 segmentsize + msgsize > 设定 segment大小(默认1G),新建
    // 间隔多长时间新建 segment 默认不启用
    // 索引文件超过阈值,一般不会发送,因为数据文件会先超
    debug(s"Rolling new log segment in $name (log_size = ${segment.size}/${config.segmentSize}}, " +
        s"index_size = ${segment.index.entries}/${segment.index.maxEntries}, " +
        s"time_index_size = ${segment.timeIndex.entries}/${segment.timeIndex.maxEntries}, " +
        s"inactive_time_ms = ${segment.timeWaitedForRoll(now, maxTimestampInMessages)}/${config.segmentMs - segment.rollJitterMs}).")
    roll()
  } else {
    // 返回已有的 segment
    segment
  }
}
// 新建 segment
def roll(): LogSegment = {
  val start = time.nanoseconds
  lock synchronized {
    val newOffset = logEndOffset
    val logFile = logFilename(dir, newOffset)
    val indexFile = indexFilename(dir, newOffset)
    val timeIndexFile = timeIndexFilename(dir, newOffset)
    // 若新建 segment 的文件已存在,则先删除
    for(file <- List(logFile, indexFile, timeIndexFile); if file.exists) {
      warn("Newly rolled segment file " + file.getName + " already exists; deleting it first")
      file.delete()
    }
    // 之前的 segment 做收尾工作,准备刷磁盘
    segments.lastEntry() match {
      case null =>
      case entry => {
        val seg = entry.getValue
        seg.onBecomeInactiveSegment()
        seg.index.trimToValidSize()
        seg.timeIndex.trimToValidSize()
        seg.log.trim()
      }
    }
    val segment = new LogSegment(dir,
                                  startOffset = newOffset,
                                  indexIntervalBytes = config.indexInterval,
                                  maxIndexSize = config.maxIndexSize,
                                  rollJitterMs = config.randomSegmentJitter,
                                  time = time,
                                  fileAlreadyExists = false,
                                  initFileSize = initFileSize,
                                  preallocate = config.preallocate)
    // 添加 segment
    val prev = addSegment(segment)
    if(prev != null)
      throw new KafkaException("Trying to roll a new log segment for topic partition %s with start offset %d while it already exists.".format(name, newOffset))
    // We need to update the segment base offset and append position data of the metadata when log rolls.
    // The next offset should not change.
    updateLogEndOffset(nextOffsetMetadata.messageOffset)

      // 新建一个 segment时,前一个segment 会异步刷磁盘
      // kafka 专门定时刷磁盘的线程,但默认不开启
      // 索引文件刷磁盘只会在这里触发
      // log 文件写 fileChannel 后,由操纵系统触发刷写/在这里触发
    scheduler.schedule("flush-log", () => flush(newOffset), delay = 0L)

    info("Rolled new log segment for '" + name + "' in %.0f ms.".format((System.nanoTime - start) / (1000.0*1000.0)))

    segment
  }
}
LogSegment
// kafka.log.LogSegment
// log 片段,每个片段包含两部分:log 和 索引
def append(firstOffset: Long, largestTimestamp: Long, offsetOfLargestTimestamp: Long, messages: ByteBufferMessageSet) {
  if (messages.sizeInBytes > 0) {
    trace("Inserting %d bytes at offset %d at position %d with largest timestamp %d at offset %d"
        .format(messages.sizeInBytes, firstOffset, log.sizeInBytes(), largestTimestamp, offsetOfLargestTimestamp))
    val physicalPosition = log.sizeInBytes()
    if (physicalPosition == 0)
      rollingBasedTimestamp = Some(largestTimestamp)

    // msg 刷到磁盘(内存)
    log.append(messages)

    // Update the in memory max timestamp and corresponding offset.
    // 更新 time 和 offset
    if (largestTimestamp > maxTimestampSoFar) {
      maxTimestampSoFar = largestTimestamp
      offsetOfMaxTimestamp = offsetOfLargestTimestamp
    }
    // append an entry to the index (if needed)
    // 更新索引,log 增加 4096 字节,增加一条索引
    if(bytesSinceLastIndexEntry > indexIntervalBytes) {
      // 增加索引
      // physicalPosition = msg 在文件中的 offset
      index.append(firstOffset, physicalPosition)
      timeIndex.maybeAppend(maxTimestampSoFar, offsetOfMaxTimestamp)
      bytesSinceLastIndexEntry = 0
    }
    // 记录 log 增加了多少字节
    bytesSinceLastIndexEntry += messages.sizeInBytes
  }
}
// kafka.log.FileMessageSet
def append(messages: ByteBufferMessageSet) {
  val written = messages.writeFullyTo(channel)
  _size.getAndAdd(written)
}
// kafka.message.ByteBufferMessageSet
// fileChannel 写 msg;os page cache
def writeFullyTo(channel: GatheringByteChannel): Int = {
  buffer.mark()
  var written = 0
  while (written < sizeInBytes)
    // 写
    written += channel.write(buffer)
  buffer.reset()
  written
}

副本
kafka 支持多副本,在源码中 broker 也称为 ReplicaManager。分区的 follower 节点 从 leader 节点拉取数据流程如下图所示
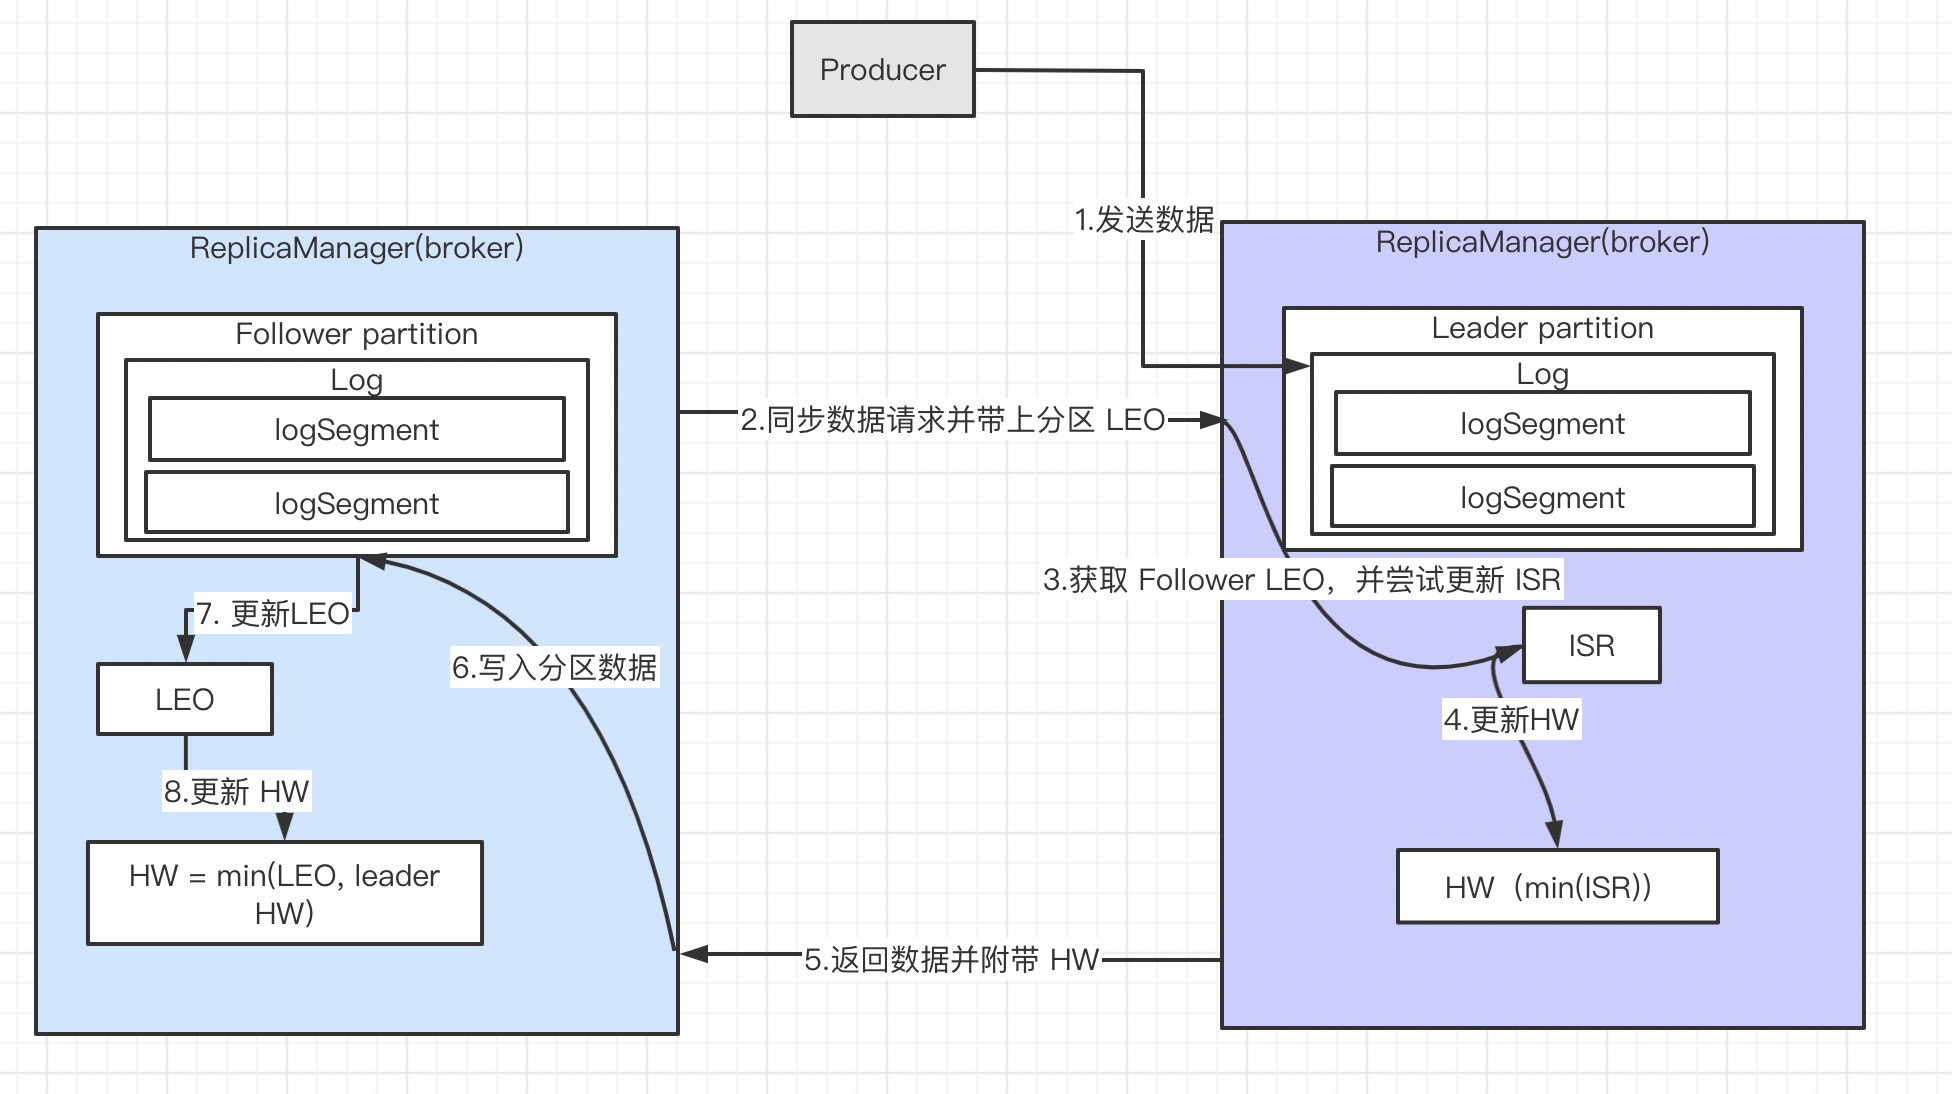
leader partition 接收 producer 数据写入 logsegment 并更新 LEO 的流程,这里不介绍了,是上一节 log 的写入流程。 从 follower partiton 如何发起 数据同步开始
ReplicaFetcherManager
// kafka.server.ReplicaManager
val replicaFetcherManager = new ReplicaFetcherManager(config, this, metrics, jTime, threadNamePrefix, quotaManager)
// ReplicaManager 发现有分区是 Follower 角色时,
// 会将当前分区添加到 ReplicaFetcherManager,等待从 Leader 分区拉取数据
replicaFetcherManager.addFetcherForPartitions(partitionsToMakeFollowerWithLeaderAndOffset)

// kafka.server.AbstractFetcherManager
// 从其他 broker 拉取数据线程数,默认一个 broker 一个线程(num.replica.fetchers)
// 若一个 broker 有好几个 leader partition,此线程一起拉
// 此处可知,kafka 集群节点不宜太多,不然线程太大
private val fetcherThreadMap = new mutable.HashMap[BrokerAndFetcherId, AbstractFetcherThread]

def addFetcherForPartitions(partitionAndOffsets: Map[TopicPartition, BrokerAndInitialOffset]) {
  mapLock synchronized {
    // 由于num.replica.fetchers 默认为1,此处表示按 broker 分组
    val partitionsPerFetcher = partitionAndOffsets.groupBy{ case(topicAndPartition, brokerAndInitialOffset) =>
      BrokerAndFetcherId(brokerAndInitialOffset.broker, getFetcherId(topicAndPartition.topic, topicAndPartition.partition))}
    // brokerAndFetcherId = broker + (拉取数据的topic 分区序列号)
    for ((brokerAndFetcherId, partitionAndOffsets) <- partitionsPerFetcher) {
      var fetcherThread: AbstractFetcherThread = null
      fetcherThreadMap.get(brokerAndFetcherId) match {
          // broker 已存在拉取数据线程,直接复用
        case Some(f) => fetcherThread = f
        case None =>
          // 若不存在新建拉取数据线程
          fetcherThread = createFetcherThread(brokerAndFetcherId.fetcherId, brokerAndFetcherId.broker)
          fetcherThreadMap.put(brokerAndFetcherId, fetcherThread)
          // 启动 dowork
          fetcherThread.start
      }
      // 添加要拉取的分区,并带上自身 LEO
      fetcherThreadMap(brokerAndFetcherId).addPartitions(partitionAndOffsets.map { case (tp, brokerAndInitOffset) =>
        tp -> brokerAndInitOffset.initOffset
      ...

// 新建拉取数据线程
override def createFetcherThread(fetcherId: Int, sourceBroker: BrokerEndPoint): AbstractFetcherThread = {
  val threadName = threadNamePrefix match {
    case None =>
      "ReplicaFetcherThread-%d-%d".format(fetcherId, sourceBroker.id)
    case Some(p) =>
      "%s:ReplicaFetcherThread-%d-%d".format(p, fetcherId, sourceBroker.id)
  }
  new ReplicaFetcherThread(threadName, fetcherId, sourceBroker, brokerConfig,
    replicaMgr, metrics, time, quotaManager)
}

// kafka.server.AbstractFetcherThread
// 拉取数据线程工作
override def doWork() {
  // run 函数中 while 一直在拉取数据
  // 若无数据可拉,leader partition 会延迟,
  // 使 follower partition 不会一直在请求空数据
  val fetchRequest = inLock(partitionMapLock) {
    // 拉取数据
    val fetchRequest = buildFetchRequest(partitionStates.partitionStates.asScala.map { state =>
      state.topicPartition -> state.value
    })
    ...
    fetchRequest
  }
  if (!fetchRequest.isEmpty)
    // 发送拉取数据请求
    processFetchRequest(fetchRequest)
}
private def processFetchRequest(fetchRequest: REQ) {
  ...
  responseData = fetch(fetchRequest)
  ...
  // 从 leader partition 拉取到的数据后
  if (responseData.nonEmpty) {
    ...
    // 处理拉取的数据
    processPartitionData(topicPartition, currentPartitionFetchState.offset, partitionData)
    ...
  }
}
// 处理从 leader patition 拉取到的数据
def processPartitionData(){
  // 拉取到的数据写入 log,与之前生产者写入 leader partition 流程一致,
  // 写入成功更新自身 LEO
  replica.log.get.append(messageSet, assignOffsets = false)
  // 更新 follower 的 HW, min(leader HW, 自身 LEO)
  val followerHighWatermark = replica.logEndOffset.messageOffset.min(partitionData.highWatermark)
  // 本身作为 follower 是可以不用保留 HW
  // 但若是 leader 节点故障,follower 有可能会成为 leader
  // 这样情况下保存 HW 是必要的
  replica.highWatermark = new LogOffsetMetadata(followerHighWatermark)
  ...
}
// kafka.server.ReplicaFetcherThread
// 发送拉取数据请求
protected def fetch(fetchRequest: FetchRequest): Seq[(TopicPartition, PartitionData)] = {
  // ApiKeys.FETCH 拉取数据标识符
  val clientResponse = sendRequest(ApiKeys.FETCH, Some(fetchRequestVersion), fetchRequest.underlying)
  new FetchResponse(clientResponse.responseBody).responseData.asScala.toSeq.map { case (key, value) =>
    key -> new PartitionData(value)
  }
}
ReplicaManager
// kafka.server.KafkaApis
// case ApiKeys.FETCH => handleFetchRequest(request)   //处理 拉取数据 的请求
// -> replicaManager.fetchMessages()

// kafka.server.ReplicaManager
def fetchMessages(timeout: Long,
                  replicaId: Int,
                  fetchMinBytes: Int,
                  fetchMaxBytes: Int,
                  hardMaxBytesLimit: Boolean,
                  fetchInfos: Seq[(TopicAndPartition, PartitionFetchInfo)],
                  quota: ReplicaQuota = UnboundedQuota,
                  responseCallback: Seq[(TopicAndPartition, FetchResponsePartitionData)] => Unit) {
  ...
  // 获取要拉取的数据并附带 leader 的 HW
  val logReadResults = readFromLocalLog(
    replicaId = replicaId,
    fetchOnlyFromLeader = fetchOnlyFromLeader,
    readOnlyCommitted = fetchOnlyCommitted,
    fetchMaxBytes = fetchMaxBytes,
    hardMaxBytesLimit = hardMaxBytesLimit,
    readPartitionInfo = fetchInfos,
    quota = quota)

  if(Request.isValidBrokerId(replicaId))
    // 更新 leader partition ISR 和 HW
    updateFollowerLogReadResults(replicaId, logReadResults)
  ...
  // respond immediately if 1) fetch request does not want to wait
  //                        2) fetch request does not require any data
  //                        3) has enough data to respond
  //                        4) some error happens while reading data
  // timeout <= 0 没数据也不需要等待
  // bytesReadable >= fetchMinBytes 只要有拉取数据就返回
  if (timeout <= 0 || fetchInfos.isEmpty || bytesReadable >= fetchMinBytes || errorReadingData) {
    val fetchPartitionData = logReadResults.map { case (tp, result) =>
      tp -> FetchResponsePartitionData(result.errorCode, result.hw, result.info.messageSet)
    }
    responseCallback(fetchPartitionData)
  } else {
    // construct the fetch results from the read results
    // 若没有数据拉取,需等待会再返回
    ...
    // replica.fetch.wait.max.ms 默认 500ms
    val delayedFetch = new DelayedFetch(timeout, fetchMetadata, this, quota, responseCallback)
    // create a list of (topic, partition) pairs to use as keys for this delayed fetch operation
    val delayedFetchKeys = fetchPartitionStatus.map { case (tp, _) => new TopicPartitionOperationKey(tp) }
    // try to complete the request immediately, otherwise put it into the purgatory;
    // this is because while the delayed fetch operation is being created, new requests
    // may arrive and hence make this operation completable.
    delayedFetchPurgatory.tryCompleteElseWatch(delayedFetch, delayedFetchKeys)
  }
}
// 读取数据
def readFromLocalLog(){
  def read(){
    val logReadInfo = localReplica.log match {
      case Some(log) =>
        val fetch = log.read(offset, adjustedFetchSize, maxOffsetOpt, minOneMessage)
      case None =>
        error(s"Leader for partition $tp does not have a local log")
    }
    // 返回除了 log ,还有leader partitoner HW
    LogReadResult(logReadInfo, localReplica.highWatermark.messageOffset, fetchSize, readToEndOfLog, None)
  }
  readPartitionInfo.foreach { case (tp, fetchInfo) =>
      // read log
      val readResult = read(tp, fetchInfo, limitBytes, minOneMessage)
      val messageSetSize = readResult.info.messageSet.sizeInBytes
      // Once we read from a non-empty partition, we stop ignoring request and partition level size limits
      if (messageSetSize > 0)
        minOneMessage = false
      limitBytes = math.max(0, limitBytes - messageSetSize)
      // 读取到的多个 partition 数据整合到一起
      result += (tp -> readResult)
    }
    result
}

// 更新 follower LEO 和 ISR列表
private def updateFollowerLogReadResults(replicaId: Int, readResults: Seq[(TopicAndPartition, LogReadResult)]) {
  debug("Recording follower broker %d log read results: %s ".format(replicaId, readResults))
  readResults.foreach { case (topicAndPartition, readResult) =>
    getPartition(topicAndPartition.topic, topicAndPartition.partition) match {
      case Some(partition) =>
        // 更新
        partition.updateReplicaLogReadResult(replicaId, readResult)
       ...
}
Partition
// kafka.cluster.Partition
// ISR 列表保存着 leader 和 follower
@volatile var inSyncReplicas: Set[Replica] = Set.empty[Replica]
def updateReplicaLogReadResult(replicaId: Int, logReadResult: LogReadResult) {
  getReplica(replicaId) match {
    case Some(replica) =>
      // 更新 follower LEO
      replica.updateLogReadResult(logReadResult)
      // 尝试更新 ISR(也包含更新 HW),当前 follower 可能之前被移除 ISR
      // 现在拉取数据,offset 追上来了,重新加入 ISR
      maybeExpandIsr(replicaId)
// 尝试更新 ISR
def maybeExpandIsr(replicaId: Int) {
  case Some(leaderReplica) =>
    // leader partition 才有 ISR
    val replica = getReplica(replicaId).get
    val leaderHW = leaderReplica.highWatermark
    if(!inSyncReplicas.contains(replica) &&
        assignedReplicas.map(_.brokerId).contains(replicaId) &&
            replica.logEndOffset.offsetDiff(leaderHW) >= 0) {
      // 重新加入 ISR 条件:offset 大于等于 HW
      ...
      // update ISR in ZK and cache
      // 在 ZK 和 Cache 都要更新 ISR
      updateIsr(newInSyncReplicas)
      replicaManager.isrExpandRate.mark()
    }
    // HW 可能也要更新
    maybeIncrementLeaderHW(leaderReplica)
}
// 以下两种情况,可能会更新
//   ISR 列表变动时
//   follower LEO 有变化
private def maybeIncrementLeaderHW(leaderReplica: Replica): Boolean = {
  // HW = min(ISR 分区 offset 最小值)
  val allLogEndOffsets = inSyncReplicas.map(_.logEndOffset)
  val newHighWatermark = allLogEndOffsets.min(new LogOffsetMetadata.OffsetOrdering)
  val oldHighWatermark = leaderReplica.highWatermark
isr-expiration
在 ReplicaManager 启动时,会开启维护 ISR 列表的线程
// kafka/server/ReplicaManager.scala
def startup() {
  // 维护 ISR 列表的线程 10s
  scheduler.schedule("isr-expiration", maybeShrinkIsr, period = config.replicaLagTimeMaxMs, unit = TimeUnit.MILLISECONDS)
  scheduler.schedule("isr-change-propagation", maybePropagateIsrChanges, period = 2500L, unit = TimeUnit.MILLISECONDS)
}
private def maybeShrinkIsr(): Unit = {
  // 每个 leader partitioner 都维护了 ISR
  allPartitions.values.foreach(partition => partition.maybeShrinkIsr(config.replicaLagTimeMaxMs))
}
def maybeShrinkIsr(replicaMaxLagTimeMs: Long) {
  // replicaMaxLagTimeMs 默认 10s
  val leaderHWIncremented = inWriteLock(leaderIsrUpdateLock) {
    leaderReplicaIfLocal() match {
      case Some(leaderReplica) =>
        val outOfSyncReplicas = getOutOfSyncReplicas(leaderReplica, replicaMaxLagTimeMs)
        if(outOfSyncReplicas.nonEmpty) {
          // 移除10s 没有拉取数据的 follower
          val newInSyncReplicas = inSyncReplicas -- outOfSyncReplicas
          // update ISR in zk and in cache
          // 更新 ISR
          updateIsr(newInSyncReplicas)
          replicaManager.isrShrinkRate.mark()
          // ISR 更改后,HW 可能也会更改
          maybeIncrementLeaderHW(leaderReplica)
        }
isr-expiration 线程定时10s 执行一次,遍历所有 leader partition 中 ISR 列表,移除超过10s 没有来拉取数据的 follower 。这样 ISR 列表里 follower 个数会变少,当 follower 的 offset 通过拉取数据追上来后又会重新加入 ISR。
副本切换
假设这么一种情况, leader 节点挂掉后,哪个 follower 节点会成为 leader 呢?
kafka 动态维护一组同步 leader 数据的副本(ISR),只有这个组的成员才有资格当选 leader,kafka 副本写入不被认为是已提交,直到所有的同步副本已经接收才认为。这组 ISR 保存在 zookeeper,正因为如此,在 ISR 中的任何副本都有资格当选 leader,这是kafka的使用模型,有多个分区和确保 leader 平衡是很重要的一个重要因素。有了这个模型,ISR 和 f+1 副本,kafka 的主题可以容忍 f 失败而不会丢失已提交的消息。
当所有节点都挂了?
- 等待在 ISR 中的副本起死回生并选择该副本作为 leader(希望它仍有所有数据)。
- 选择第一个副本 (不一定在 ISR),作为leader。
在 kafka 0.11 之前选择第二种,0.11 之后选择第一种。
集群管理
选举
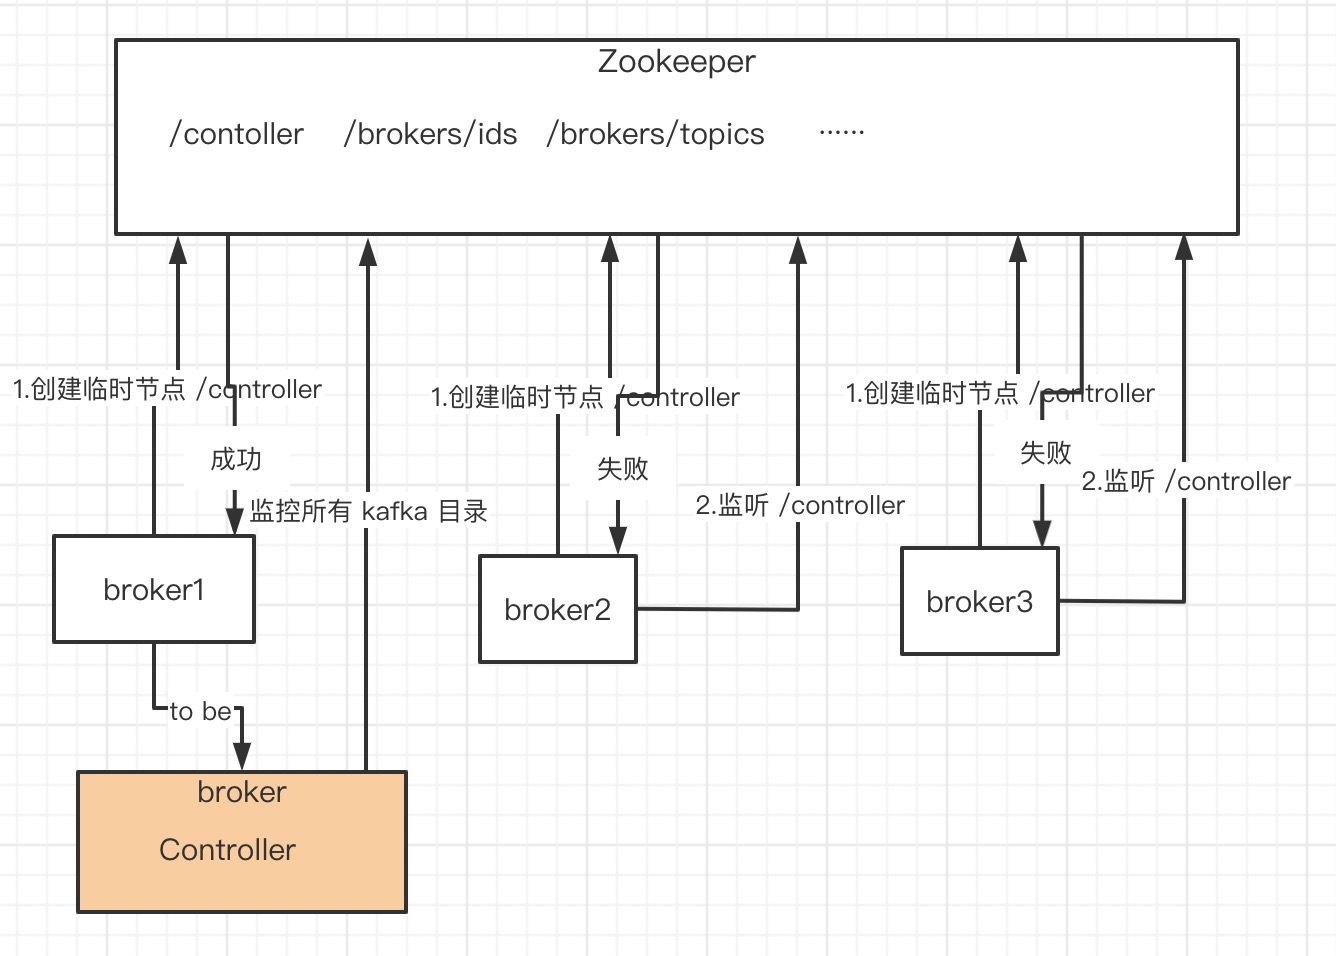
kafka 也是主从,Controller 管理元数据,并将元数据同步到所有 broker。每个 broker 在启动时都会竞选成为 Controller。
// kafka.server.ZookeeperLeaderElector
def startup {
  inLock(controllerContext.controllerLock) {
    // 监听 /controller,回调函数 LeaderChangeListener
    // 若集群的 Controller 发生故障,/controller 节点会发生变化,
    controllerContext.zkUtils.zkClient.subscribeDataChanges(electionPath, leaderChangeListener)
    // 选举 Controller 过程
    elect
  }
}
def elect: Boolean = {
  val timestamp = SystemTime.milliseconds.toString
  // 在 /controller 写入的内容:brokerid,version,timestamp
  // 哪个 broker 创建 /controller 成功,谁就是  Controller
  // 这个过程就是 kafka 集群 Controller 选举
  val electString = Json.encode(Map("version" -> 1, "brokerid" -> brokerId, "timestamp" -> timestamp))
  // 获取 Controller broker id
  leaderId = getControllerID
  if(leaderId != -1) {
    // 若有 Controller broker id,表示当前已经有 Controller
    // 不继续选举过程
      debug("Broker %d has been elected as leader, so stopping the election process.".format(leaderId))
      return amILeader
  }
  // 继续选举过程
  // electionPath = /controller
  // 文件内容 = brokerid,version,timestamp
  // 创建 /controller 临时节点
  try {
    val zkCheckedEphemeral = new ZKCheckedEphemeral(electionPath,
                                                    electString,
                                                    controllerContext.zkUtils.zkConnection.getZookeeper,
                                                    JaasUtils.isZkSecurityEnabled())
    zkCheckedEphemeral.create()
    info(brokerId + " successfully elected as leader")
    // 创建临时节点成功,表示此 broker 成为 Controller
    leaderId = brokerId
    // 成为 Controller 之后,初始化工作 onControllerFailover
    onBecomingLeader()
  } catch {
    case e: ZkNodeExistsException =>
      // 此异常表示 /controller 节点已经生成,直接获取 Controller broker id
      leaderId = getControllerID
选举过程很简单:哪个 broker 创建 /controller 成功,谁就是 Controller
Controller 管理整个集群的元数据,成为 Controller 后需要先初始化。
// kafka.controller.KafkaController
val controllerContext = new ControllerContext(zkUtils, config.zkSessionTimeoutMs)
// 分区管理
val partitionStateMachine = new PartitionStateMachine(this)
// broker 管理
val replicaStateMachine = new ReplicaStateMachine(this)
//  /controller
private val controllerElector = new ZookeeperLeaderElector(controllerContext, ZkUtils.ControllerPath, onControllerFailover,
  onControllerResignation, config.brokerId)

/* 当broker 成为 Controller 之后,回调函数
  * 1、监听 zk目录,感知集群变化,管理元数据
  * 2、增加 controller epoch,可预防脑裂(若集群出现两个 Controller,则epoch 大的才是需要的 Controller)
  * 3、初始化集群元数据信息
  * 4、
  */
def onControllerFailover() {
  if(isRunning) {
    info("Broker %d starting become controller state transition".format(config.brokerId))
    //read controller epoch from zk
    readControllerEpochFromZookeeper()
    // increment the controller epoch
    incrementControllerEpoch(zkUtils.zkClient)
    // before reading source of truth from zookeeper, register the listeners to get broker/topic callbacks
    // 监听 /admin/reassign_partitions,topic 分区增加/减少 PartitionsReassignedListener
    registerReassignedPartitionsListener()
    //监听 /isr_change_notification,ISR 列表变化,IsrChangeNotificationListener
    registerIsrChangeNotificationListener()
    registerPreferredReplicaElectionListener()
    // 监听 /brokers/topics 和 /admin/delete_topics,topic 变化,TopicChangeListener
    // 新建 topic 可以感知
    partitionStateMachine.registerListeners()
    // 监听 /brokers/ids,broker 变化,BrokerChangeListener
    replicaStateMachine.registerListeners()
    // 初始化集群元数据
    initializeControllerContext()
    ...
Controller 通过监听 zk 节点感知集群变化,初始化数据大部分是从 zk 节点读取内容。
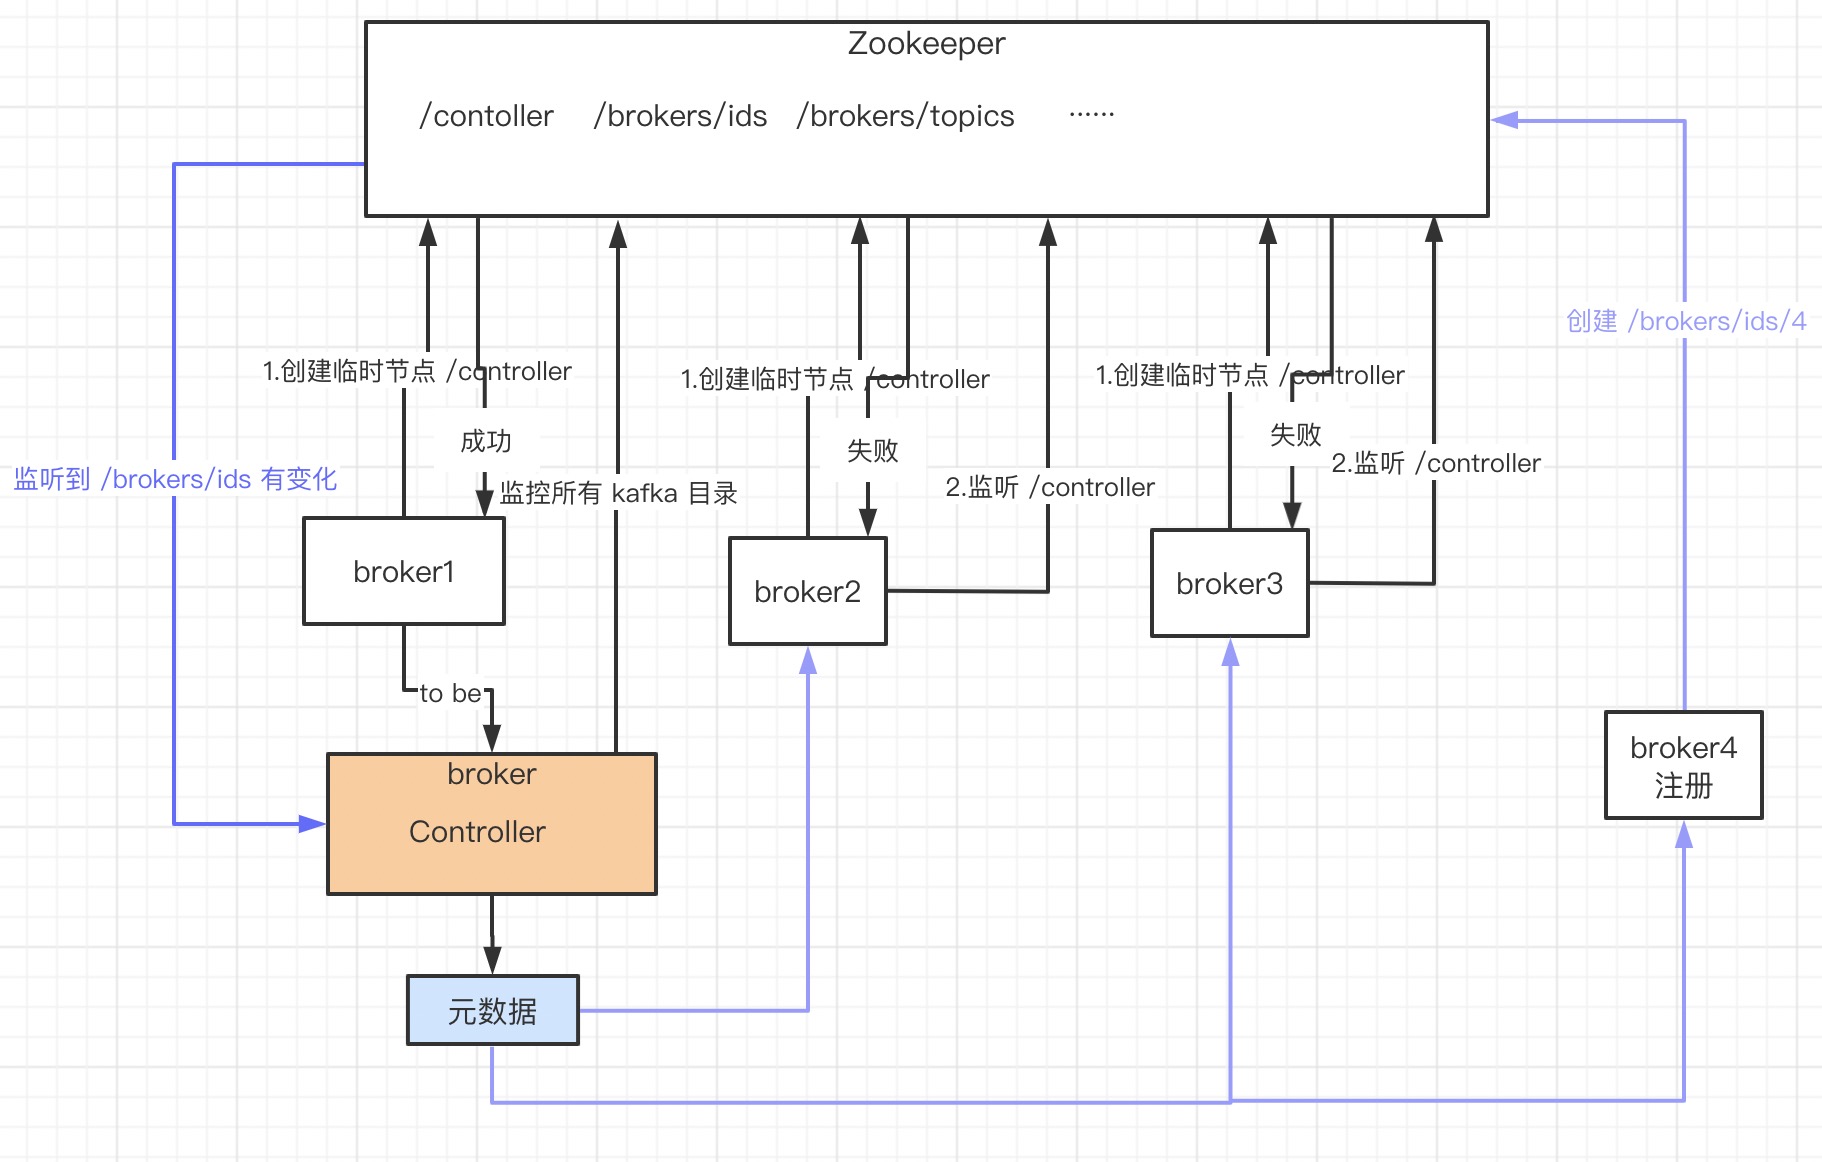
broker 注册
// kafkaHealthcheck.startup()
// -> kafka.server.KafkaHealthcheck.register()
// -> zkUtils.registerBrokerInZk

// kafka.utils.ZkUtils
def registerBrokerInZk(id: Int,
                        host: String,
                        port: Int,
                        advertisedEndpoints: collection.Map[SecurityProtocol, EndPoint],
                        jmxPort: Int,
                        rack: Option[String],
                        apiVersion: ApiVersion) {
  // 节点路径:/brokers/ids/brokerid
  val brokerIdPath = BrokerIdsPath + "/" + id
  val timestamp = SystemTime.milliseconds.toString
  val version = if (apiVersion >= KAFKA_0_10_0_IV1) 3 else 2
  // 节点要写入的内容 jsonMap:ip、端口号、时间戳
  var jsonMap = Map("version" -> version,
                    "host" -> host,
                    "port" -> port,
                    "endpoints" -> advertisedEndpoints.values.map(_.connectionString).toArray,
                    "jmx_port" -> jmxPort,
                    "timestamp" -> timestamp
  )
  rack.foreach(rack => if (version >= 3) jsonMap += ("rack" -> rack))

  val brokerInfo = Json.encode(jsonMap)
  // 创建临时节点
  registerBrokerInZk(brokerIdPath, brokerInfo)
broker 注册很简单,就是在 /brokers/ids/ 目录写下自己的临时节点。broker 注册好之后,Controller 如何感知呢?
Controller 在启动时监听一些列目录,其中就有 /brokers/ids/ ,我们看看其回调函数。
// 监听 /brokers/ids,broker 变化,BrokerChangeListener
// replicaStateMachine.registerListeners()

// kafka.controller.ReplicaStateMachine.BrokerChangeListener
class BrokerChangeListener() extends IZkChildListener with Logging {
  def handleChildChange(parentPath : String, currentBrokerList : java.util.List[String]) {
    // 从zk 得到当前所有 broker
    val curBrokers = currentBrokerList.map(_.toInt).toSet.flatMap(zkUtils.getBrokerInfo)
    val curBrokerIds = curBrokers.map(_.id)
    val liveOrShuttingDownBrokerIds = controllerContext.liveOrShuttingDownBrokerIds
    // 当前brokers - 之前的brokers = 新增的 broker
    val newBrokerIds = curBrokerIds -- liveOrShuttingDownBrokerIds
    //  之前的brokers - 当前brokers = 挂掉的brokers
    val deadBrokerIds = liveOrShuttingDownBrokerIds -- curBrokerIds
    val newBrokers = curBrokers.filter(broker => newBrokerIds(broker.id))
    controllerContext.liveBrokers = curBrokers
    val newBrokerIdsSorted = newBrokerIds.toSeq.sorted
    val deadBrokerIdsSorted = deadBrokerIds.toSeq.sorted
    val liveBrokerIdsSorted = curBrokerIds.toSeq.sorted
    info("Newly added brokers: %s, deleted brokers: %s, all live brokers: %s"
      .format(newBrokerIdsSorted.mkString(","), deadBrokerIdsSorted.mkString(","), liveBrokerIdsSorted.mkString(",")))
    newBrokers.foreach(controllerContext.controllerChannelManager.addBroker)
    deadBrokerIds.foreach(controllerContext.controllerChannelManager.removeBroker)
    if(newBrokerIds.nonEmpty)
      // 有新增的 broker
      // 更新自身元数据,并同步到所有 broker
      controller.onBrokerStartup(newBrokerIdsSorted)
    if(deadBrokerIds.nonEmpty)
      // 有挂掉的 broker,流程与有新增相同,不在赘述
      controller.onBrokerFailure(deadBrokerIdsSorted)
  }
}
// kafkaController.onBrokerStartup
// -> partitionStateMachine.triggerOnlinePartitionStateChange()
// -> brokerRequestBatch.sendRequestsToBrokers(controller.epoch)
// kafka.controller.ControllerBrokerRequestBatch
def sendRequestsToBrokers(controllerEpoch: Int) {
  ...
  // 发送请求,type = ApiKeys.UPDATE_METADATA_KEY
  controller.sendRequest(broker, ApiKeys.UPDATE_METADATA_KEY, Some(version), updateMetadataRequest, null)
  ...
}
很显然,到这一步我们又要去 KafkaApis 代码了。
// case ApiKeys.UPDATE_METADATA_KEY => handleUpdateMetadataRequest(request)
// -> replicaManager.maybeUpdateMetadataCache(correlationId, updateMetadataRequest, metadataCache)
// -> metadataCache.updateCache(correlationId, updateMetadataRequest)
// -> 更新各种数据结构
Topic 新建
创建 topic 命令
./kafka-topic.sh create xxx
查看 kafka-topic.sh
# 可知执行 kafka.admin.TopicCommand
exec $(dirname $0)/kafka-run-class.sh kafka.admin.TopicCommand "$@"
// kafka.admin.TopicCommand
// createTopic(zkUtils, opts)
// AdminUtils.createTopic(zkUtils, topic, partitions, replicas, configs, rackAwareMode)

// kafka.admin.AdminUtils
def createTopic(zkUtils: ZkUtils,
                topic: String,
                partitions: Int,
                replicationFactor: Int,
                topicConfig: Properties = new Properties,
                rackAwareMode: RackAwareMode = RackAwareMode.Enforced) {
  val brokerMetadatas = getBrokerMetadatas(zkUtils, rackAwareMode)
  // replicaAssignment = Map[Int, Seq[Int]] = Map[partitionindex,Seq[brokerid]
  // 为 partition 分配 broker
  //  partition0: [broker1,broker2,broker3]
  //  partition1: [broker4,broker2,broker3]
  //  ...
  val replicaAssignment = AdminUtils.assignReplicasToBrokers(brokerMetadatas, partitions, replicationFactor)
  //
  AdminUtils.createOrUpdateTopicPartitionAssignmentPathInZK(zkUtils, topic, replicaAssignment, topicConfig)
}
// writeTopicPartitionAssignment(zkUtils, topic, partitionReplicaAssignment, update)
private def writeTopicPartitionAssignment(zkUtils: ZkUtils, topic: String, replicaAssignment: Map[Int, Seq[Int]], update: Boolean) {
  try {
    // 得到 topic 在 zk 路径
    val zkPath = getTopicPath(topic)
    // 获取要写入 topic 节点的内容:{"version":1,"partitions":{"4":[76,77,78],"5":[77,79,75],"1":[78,79,75],"0":[77,78,79],"2":[79,75,76],"3":[75,76,77]}}
    val jsonPartitionData = zkUtils.replicaAssignmentZkData(replicaAssignment.map(e => e._1.toString -> e._2))

    if (!update) {
      info("Topic creation " + jsonPartitionData.toString)
      // 创建 topic 在 zk 路径,写入数据
      zkUtils.createPersistentPath(zkPath, jsonPartitionData)
    } else {
      info("Topic update " + jsonPartitionData.toString)
      zkUtils.updatePersistentPath(zkPath, jsonPartitionData)
    }
    debug("Updated path %s with %s for replica assignment".format(zkPath, jsonPartitionData))
  } catch {
    case e: ZkNodeExistsException => throw new TopicExistsException("topic %s already exists".format(topic))
    case e2: Throwable => throw new AdminOperationException(e2.toString)
  }
}
到此为止,创建 Topic 的过程,就是在 /brokers/topics 下新建 topic 节点,并写入分区所在的 brokerid。毫无疑问,接下来肯定是 Controller 监听到目录变化调用回调函数。
// 监听 /brokers/topics 和 /admin/delete_topics,topic 变化,TopicChangeListener
// partitionStateMachine.registerListeners()
总结
可以来看看 broker 运行至少需要多少个线程:
- 网络:1 + 3 +8
- 副本:(broker-1) + 2